The Settings tab in 01Cloud environments provides a comprehensive suite of tools for customizing and configuring various aspects of your environment. From managing domains and permissions to optimizing resource allocation and automating tasks, the settings available in 01Cloud empower users to tailor their environments to meet their specific needs and objectives. By leveraging these settings effectively, users can enhance performance, security, and scalability while optimizing operational efficiency and cost-effectiveness.
Domain:
The Domain section allows you to manage the domain settings for your environment. You can view the current domain associated with your environment and set a custom domain if desired. Additionally, you can provision SSL/TLS certificates for secure communication over HTTPS.
Steps to Manage Your Domain Settings:
-
Navigate to the Domain section of the Environment tab in your 01Cloud account.
-
View the available domain for your site and set a custom domain by clicking on the SET button.
-
After setting a custom domain, you can provision a certificate.

Permissions:
In the Permissions section, you can manage user permissions for your environment. This includes adding new users and assigning them different roles with varying levels of access privileges. Role-based access control helps ensure that users have appropriate permissions to perform their tasks while maintaining security and compliance.
Steps to manage your permissions settings:
-
Navigate to the Permissions section of the Environment tab in your 01Cloud account.
-
Click on the ADD USER button to add a New User.

-
Assign different roles to the user.

Resources:
The Resources section enables you to manage the resource allocation for your environment. You can adjust CPU and Memory Resources, enabling you to scale resources up or down based on workload requirements. Additionally, you can enable autoscaling and load balancing to dynamically adjust resource allocation based on demand, optimizing performance and cost-efficiency.
Steps to Manage Your Resources Settings:
-
Navigate to the Resources section of the Environment tab in your 01Cloud account.
-
Adjust the CPU and Memory Resources using the sliders provided.

-
To Enable Autoscaling, select the auto scaling options and set fields like maximum replicas, minimum replicas when cpu usage and memory usage threshold exceeds.

-
Once the advanced settings page loads, you will see several options for configuring your autoscaling settings.

- The first option is Average usage interval, which allows you to set the average amount of time between measurements of resource usage.
- The Change by field lets you set the percentage increase or decrease in the number of replicas for each scaling action.
- The “Average change interval” field lets you set the average amount of time between scaling actions.
-
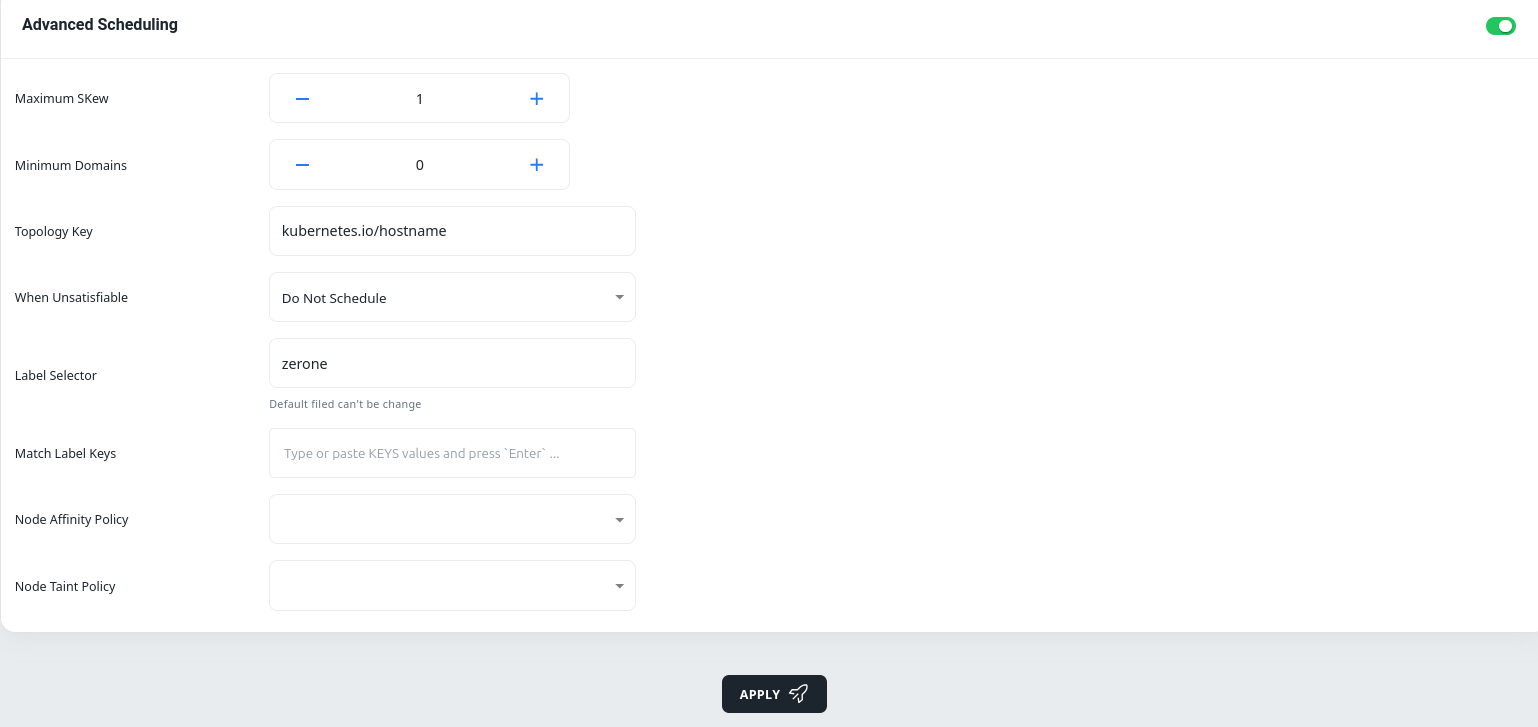
After enabling auto scaling, there is an option called Advanced Scheduling. Provide the values for maximum skew, minimum domains and mention topology key etc..and click on Apply.

Storage:
The Storage section allows you to manage storage resources for your environment. You can view available storage, create new storage volumes, and enable file manager for convenient management of files and data. Storage settings are essential for managing data storage and access within your environment, ensuring efficient utilization of storage resourc
Steps to Manage Your Storage Settings:
-
Navigate to the Storage section of the Environment tab in your 01Cloud account.
-
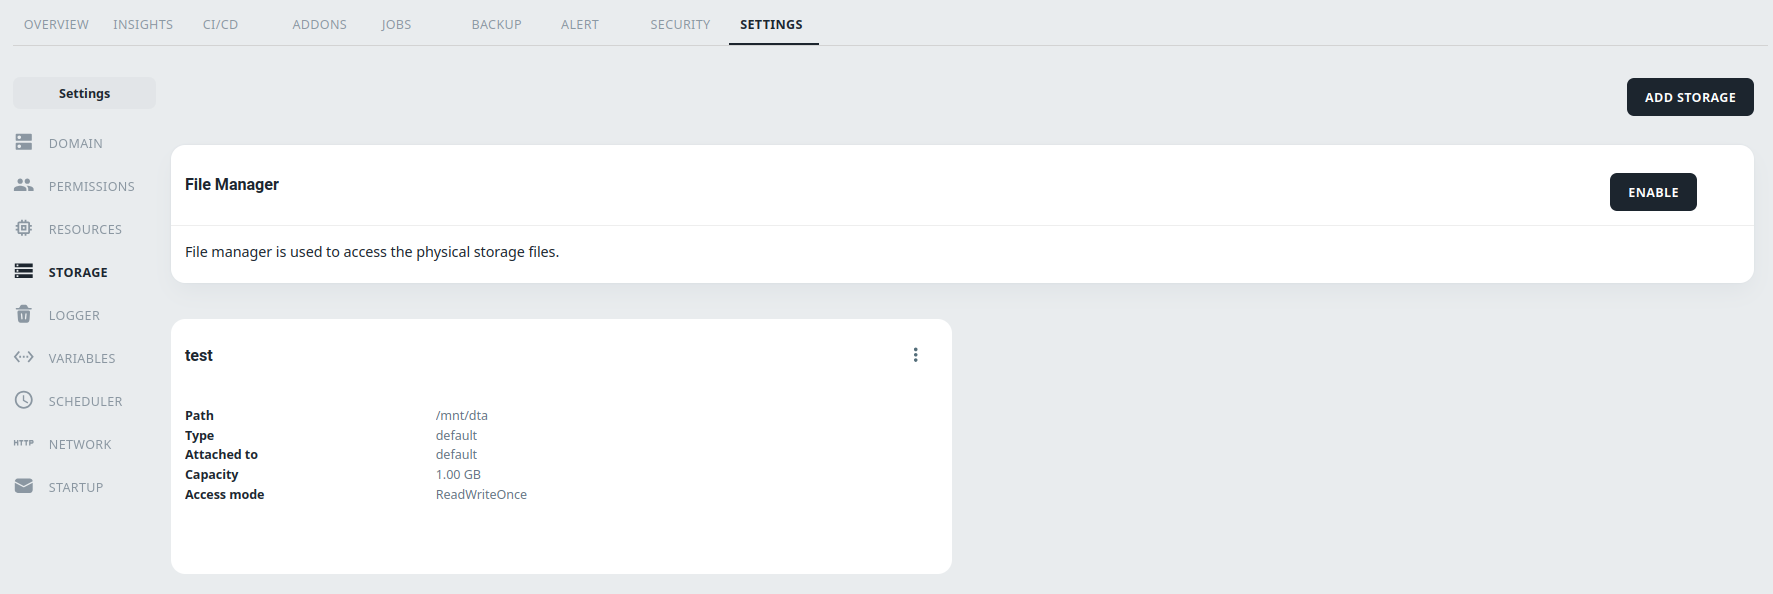
View the available storage for your environment.
-
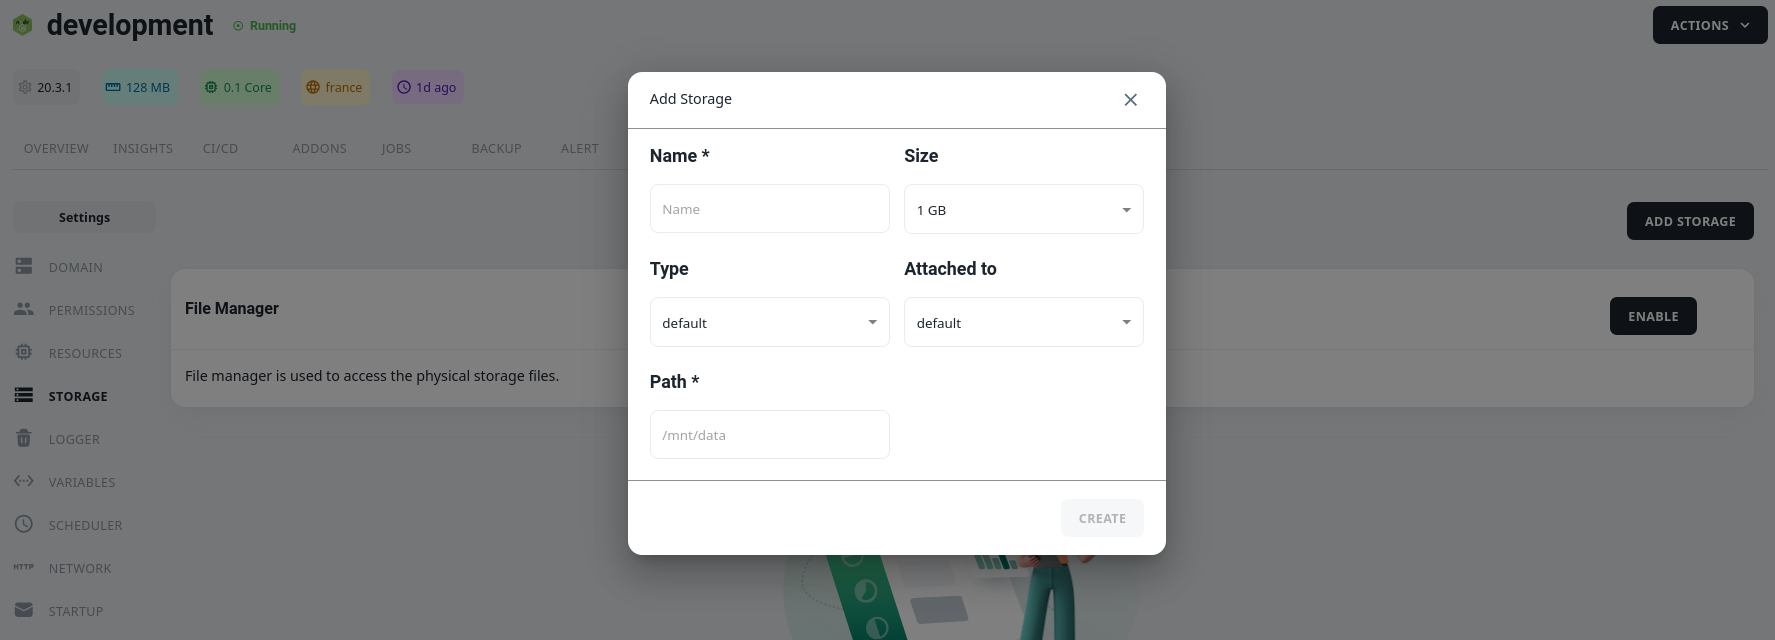
Click on the ADD STORAGE button to Create New Storage.

Note: In a template environment, the storage resources are pre-configured when the environment is created and cannot be modified afterwards. It may be necessary to create a new environment or modify an existing one to allocate more storage resource.
-
Enter the Name, Size, Type, and Path for the New Storage.

-
To enable file manager, click on the ENABLE button in the file manager section. This will allow you to view and manage your storage data directly from the file manager. The file manager access URL is provided for your convenience.

Logger:
In the Logger section, you can manage logger settings for your environment. This includes configuring external logging providers to store and analyze environment logs. By integrating with external logging services, you can gain valuable insights into environment performance, troubleshoot issues, and maintain audit trails for compliance purposes.
Steps to Manage Your Logger Settings:
-
Navigate to the Logger section of the Environment tab in your 01Cloud account.

-
Enable logger to view and save environment logs in an external provider.

Variables:
The Variables section enables you to manage environment variables for your environment. You can add new variables, update existing ones, and specify whether changes should be applied immediately. Environment variables are useful for configuring application settings, connection strings, and other parameters that may vary across different environments.
Steps to Manage Your Variables Settings:
-
Navigate to the Variables section of the Environment tab in your 01Cloud account.
-
You can only add variable in Custom and Container Registry Environment.
-
Click on the ADD VARIABLE button to add a new variable.

-
The Apply Immediately button will update the environment immediately.
-
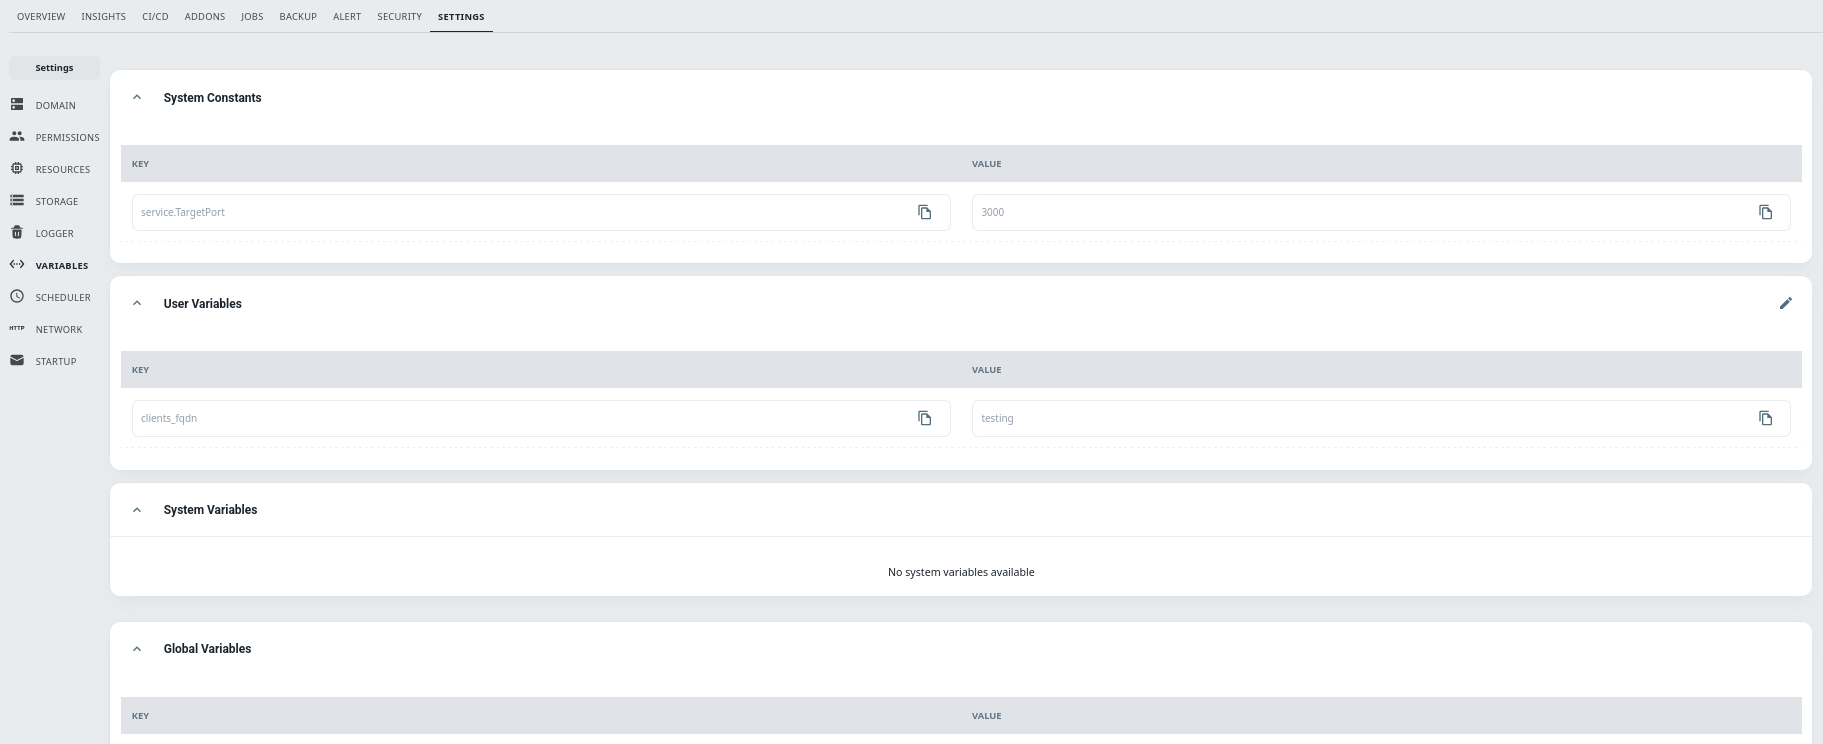
You have three variables available: System Variables, Environment Variables, and Global Variables.
Scheduler:
In the Scheduler section, you can manage scheduler settings for your environment. You can enable scheduling and specify the frequency, start time, and stop time for scheduled tasks or jobs. Scheduler settings allow you to automate recurring tasks, such as data backups, maintenance activities, or batch processing jobs, improving operational efficiency and reliability.
Steps to Manage Your Sheduler Settings:
-
Navigate to the Scheduler section of the Environment tab in your 01Cloud account.
-
Enable scheduler and specify the required Frequency, Start and Stop Time.

Network:
The Network in 01Cloud provides centralized control for managing IP whitelisting, which is crucial for enhancing security and controlling access. IP whitelisting allows you to restrict access to specific services or applications by defining a set of IP addresses permitted to access the system. This enhances security by only allowing trusted IPs to connect, reducing the risk of unauthorized access.
Benefits:
-
Enhanced Security: Prevents unauthorized access, reducing exposure to cyberattacks.
-
Granular Access Control: You can add specific IPs or IP ranges, allowing access only from known locations.
-
Flexibility for Temporary Access: Temporary IPs can be whitelisted and later removed as needed for specific tasks or external collaborators.
Steps to Add IP Whitelisting in 01cloud:
-
Go to the NETWORK tab in the environment settings.

-
Click on Pencil Icon and again click on ADD IP ADDRESS. Enter the IP address or range you wish to whitelist.

-
Once you’ve added the IP address, click on UPDATE IP LIST.

-
After updating IP list, your changes have been updated.

Note: You may also be able to enter CIDR notation if you want to whitelist a range of IPs.
Startup Job:
The Startup Job tab, available for Custom Environments, allows you to configure a container to run before the environment is initialized. This is useful for performing setup or configuration tasks before the main application code is executed, ensuring that the environment is properly configured and ready for use.
Note: Startup Job Settings is available only for Custom Environment.
Steps to Enable a Startup Job:
-
Navigate to the environment settings and select the STARTUP tab.

-
Click the ADD STARTUP JOB button and give your job a name.

-
Select the image containing the code you want to run.
-
Click SAVE to save the changes.
Conclusion:
In this way, you can customize settings for an Environment in 01Cloud, including managing domains, resources, permissions, storage, logger, environment variables, scheduler, and startup jobs, network.
